Pages

Sunday, November 28, 2010

White Saturday

I hope everyone had a peaceful, safe, yummy weekend.  I try not to participate in Black Friday events because I really don't like crowds.  But we did venture out to downtown Boise on Saturday in the snow.  First we had a nice lunch at P.F. Chang's and then we did a little bit of holiday shopping. 

While out, I tried to find and take pictures of the other businesses that participated in the Window Winter Gallery display.  I wasn't able to get to all of them but here are a few of the windows.

This was done at the Brick Oven Bistro.
These cowgirls were at the American Clothing Gallery.
These people were wearing their colorful glasses at Artisan Optics.
This was at the Mac Life store.
This was at The Chocolate Bar, which we also went into.
Inside we found delicious things and I even found a high heel I wouldn't mind owning!

Tuesday, November 23, 2010

Window Completed

Yesterday, Anna and I managed to install the Winter Window at the Idaho Historical Museum. Lucky Anna was out of school and was roped in to help me (I did pay her and she wanted to help anyway). It took us three and a half hours. I think it looks very festive, for now. I just hope the blizzard will take it easy on my work.

First, we painted a couple of "candy cane" poles on the window to help "frame and contain" the design.  Anna did one and I did one.
After painting, I screwed in the poles to the window frame.  I already had all the strings ready so then it was just a matter of threading and anchoring them through the holes I had drilled in the pole.
The above is a cardinal made from felt scraps with twisty ties sewn to its wings to keep them "flying".

 
Anna with the finished masterpiece.  Because the windows are dark, you can see it from pretty far away.
 

Sunday, November 21, 2010

Winter Window

Back in October, I signed up to decorate a window for the Downtown Business Association and Boise City Department of Arts & History's Winter Window Gallery. They match artists (and pay them) with downtown businesses to decorate their windows to make the downtown more festive for the holidays.

Before I knew which business I was assigned to, I had some ideas about creating a 3D display instead of just painting on the windows like many do. But I needed to see which business I would get. I was assigned to do the windows for the Idaho State Historical Museum. And the contact person was someone I knew from yoga class (what a coincidence).

We met to look at and discuss ideas for the windows. The challenge with the museum's windows is that they are tinted and are dark. Even holding a piece of notebook paper right next to the window on the inside was not very visible from the outside. Total bummer for me and my ideas that were brewing! I looked and we discussed options. I discovered I could do something on the outside of the window because there are screw holes on the sides of the windows at top and bottom for the museum to be able to hang banners.

New ideas started to form and I also found out that their featured exhibit in December will be "The Power to Play -- From Trash to Treasure". It is an exhibit of toys made by children around the world who are poor and use trash to create play things. This was good because I wanted to use recycled items and it would tie into the exhibit.

I went home, researched ideas and drew a sketch for the approval of the museum. I would create different items (i.e. snowflakes, beads, birds, etc.) from recycled materials which would hang from strands of fishing line on the outside of the windows (tied to poles that would be screwed in at top and bottom of the windows).

I've been spending many hours working on these components. Since this is going to be on the outside, I've been concerned about weather conditions. I've coated cardboard and paper items with a coating of Mod Podge and spray clear acrylic to make them sturdy enough. Some things are made from plastic and fabric so I am not as concerned about those.

The strands are ready and I install everything tomorrow morning, just in time for the BLIZZARD that is expected to hit Idaho on Tuesday and Wednesday. Yes, I predict much rain and snow and wind for the month of Nov. and Dec., the amount of time this Winter (and I do mean WINTER) window is suppose to be up).

Below are some of the component parts (will post tutorial later).

This picture below is a test piece. It is just part of a component that is made with two layers of thick paper glued together and coated with Mod Podge. It has been sitting out in the snow and rain for two days and still is managing to hold up. So that gives me hope that this whole thing I have spent many, many hours working on is going to hold up through the weather.

Thursday, November 18, 2010

Learning New Tricks: Part IV (commission agreement)

The last thing I needed in preparation for my meeting with the patron was a commission agreement.  I had some things I wanted to include but didn't really know how to start.  So I started researching.

I knew the Boise Art Museum had a program where they try to match patrons with artists in commissioning artworks to be made, resulting in a show at the museum.  I asked if I could see a copy of their agreement to get some ideas.  Then I went online and searched "art commission agreement" and found examples different people had put on the internet.  This was enough for me to start drafting my own.  But I also could have contacted the city or state art commission and they might have had some examples or instructions.

What I included in my agreement:
-names and date (of course)
-sketch # (since I had several)
-explanation that final artwork may vary from the sketch as design decisions are made during process of making piece
-size selection (I had a choice of 3 ft. by 3 ft. or 4 ft. by 4 ft. with a price listed next to each)
-payment schedule (a deposit of 30% of price was to be made on acceptance of sketch.  This covers my time even if the artwork is rejected in the end.  Many people had a 50% deposit)
-deadline date (and what happens if it is missed)
-right of refusal (the patron can refuse final piece and forfeit deposit and can refuse if deadline is missed)
-ownership explanation
-copyright explanation
-signature spaces

It was two pages, well spaced, and I think I covered everything I needed. Some of the examples I looked at were simpler and some had more legalese wording.  I wanted mine to be simple and understandable.

And the result is . . .
The patron selected a sketch and agreed to the commission! Now I have to make a 4 ft. by 4 ft. piece by Dec. 17.  That doesn't sound too bad except that I am having my parents visit over Thanksgiving for about a week and a half (sewing room is guest bedroom).  I've been spending a lot of time recently getting ready to do a Winter Window for the Idaho State Historical Society (more about that in another post) and all the other usual activities and holiday-getting-ready activities. It has yet to be started.

Tuesday, November 16, 2010

Etsy

I have put quite a few more things in my Etsy shop and I am offering free shipping until Dec. 9, after which my shop will be closed until the end of the year.  It will re-open after the new year.  Check out the other artists and crafters as well, they might just have that special present you need to get for someone.

Monday, November 15, 2010

Learning New Tricks: Part III (final sketches)

After many obsessive hours and small thumbnail sketches, I narrowed it down to four to show the patron.

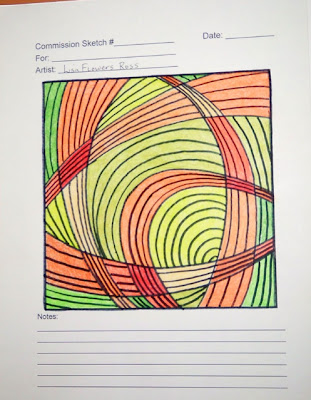
To make a nice presentation, I created a generic sketch form on my computer.  At the top of the page was a space for the patron's name, a space for my name, a space for the sketch number and the date.  Then I created a square box that the sketch would be drawn in and on the bottom of the page I had blank line for notes.  I printed out several copies and drew the final designs on these. One design for each page.

I used colored pencils to fill them in with the palette choice (which I drew from the inspiration photo).  Since I wanted to show how the quilting lines would be but didn't want to draw them directly on the colored design, I traced the box and design on a transparency sheet in permanent marker and drew the quilting lines on that, again with permanent marker.  Now, they were all black which was not the color I was going to use for them, but it was just to get the idea across.  Since the transparency was a separate piece, it could be removed to see the design better.

Then I also created a fabric swatch palette because the fabric colors don't exactly match the colored pencils.  I cut a little rectangle of each from different fabrics and stapled them to a piece of card stock.  I didn't put a swatch from every fabric I have, but the ones I thought would work.  There were enough fabrics for the patron to have a good selection.

The two fabrics that are turned sideways are the only commercial fabrics.  The rest are my hand dyed fabrics and I explained to the patron at the first meeting that I dye most all my fabric in the summer so I probably wouldn't be dyeing any extra now (although if absolutely necessary, I would dye more if needed).

I think this seemed like a fairly professional presentation of ideas.

Next installment: the commission agreement.

Thursday, November 11, 2010

Learning New Tricks: Part II (sketches)

Usually when I'm working on an idea for an artwork, I am abstracting from something I've seen, a photo I've taken, or an idea that's just popped into my head.  Sometimes I will just take some fabrics and play with them without any preconceived notion.  That's pretty rare, as most of the time I am working from a sketch.

I think I've mentioned before that I have a harder time creating something when there are "outside" limitations imposed on me.  For example, the themes and color palettes used for the "play along" pieces I do with the Twelve by Twelve group.  Also, years ago I tried some fabric challenges (where you are given a specific fabric to work with) and those where really hard for me.  I decided I would not participate in any of those again.

Size restrictions are sometimes hard.  I definitely have a harder time with a square format, which is what the Twelve by Twelve group uses and I have yet to adhere to.  I have done some square pieces but most of them just started with a square and I started playing with fabric to fit on the square.

So, creating sketches for a commission piece was quite challenging for me.  Some of the reasons why?
1) The patron wants a square piece.
2) The patron wants bright colors (I usually tend toward earthy colors)
3) The patron wants a piece with "high energy" (In many of my pieces I am trying to go for a calm effect).
4)  I don't know the patron personally or his likes, except for the picture of the painting.
5) The patron wanted something abstract (maybe meaning more like non-objective)
6) The patron wants a minimum size of 3 ft. by 3 ft.  (I don't usually work that large.  But I was thinking not too long ago that I should try a really big piece just to see what it is like.  How serendipitous that an opportunity to make a large piece arose!)

After seeing that, you may wonder why he approached me at all.  I wondered the same thing, but he must have seen something in my work he liked.  He did say he wanted me to do my own work.

I was trying to think of where I could possibly start since I didn't have any ideas.  What I decided to do was look through some of my photos hoping that I could get inspiration that way.  I poured over our photos on the computer, printed some out, racked my brain, obsessed, looked through books and did many, many thumbnail sketches to try to come of with just a few I thought would be good enough.

From our first meeting until our meeting where I was to present my sketches, I had about three weeks.  Almost an entire week of that time was when I was away for my college reunion.  I brought sketch books, pencils and photos with me hoping I would be able to work on it, but I could not.

Below you can see some of the thumbnails and sketches in progress.


Next installment: finalizing sketches.

Tuesday, November 9, 2010

Learning New Tricks: Part I (the offer)

Does anyone else feel like the days are going faster and faster as the year winds down?  I'm pretty busy right now and part of the reason is something new to me. I am going to write about it here, in case anybody else might be in the same situation.

I was contacted about a month ago about the possibility of doing a commissioned artwork.  The person had seen my work in Meridian.  You would think I would be elated about this offer as I have not done one before.  But my first reaction was panic.  Not so much because of the idea of a commission, but more so because the person wanted me to do a piece based on a painting that he saw in San Francisco.  A picture of the painting was included and to me it was totally opposite of my own work.  My other thought was that perhaps he really wanted that painting and nothing I could create would be good enough.  I've also heard stories of other artists getting burned with commission work.

After the initial panic had faded and I started to mull over things, I decided this is a great opportunity even if it doesn't work out.  So I asked to meet with the person to find out more about what he was really looking for before I started working on any sketches.

Before the meeting I prepared some questions to ask him to get a better idea of the specifics of what he wanted.  I typed these out because I know I can't always rely on my memory.  I also brought the picture of the painting and some pictures of my work thinking that I should discuss what I perceived to be very real differences between the two.  I also had a business card and my calendar.  In addition, I had brought some small works to show the difference between fused applique and piecing as well as different quilting lines.  Was that overkill?  Maybe, but even though I have never done a commission piece before, I certainly want to appear professional, even if I have no idea what I'm doing.

The meeting went well.  The person is very nice and he did say he wanted me to do my own work.  He also told me what he liked about the painting and which aspects he hoped that I could incorporate into my work. We scheduled another meeting time for looking at the sketches I would create.

Next installment: Sketches

Thursday, November 4, 2010

Back to the Beach

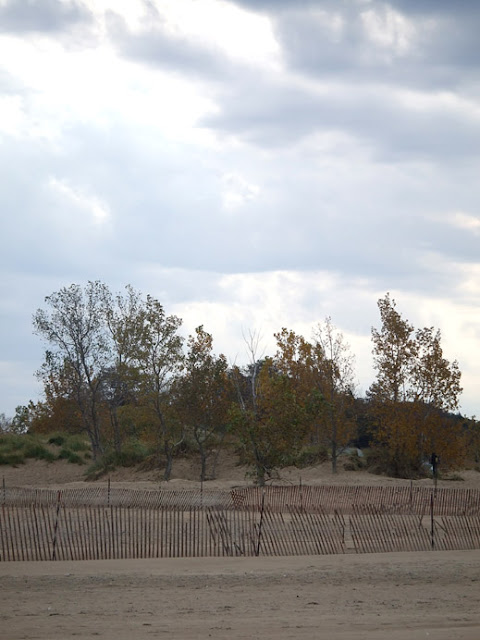
Before I left Michigan, I had to go to the beach on Lake Michigan, where we used to go sometimes to take a break from studying.  So before the long drive back to Illinois on Sunday morning, I went out to Holland State Park.  It was a lovely morning - cool, but not chilly.  The sun was peaking out between the clouds.  There were a few other people there, but it was calm and quiet.  I was enjoying it so much, I stayed an hour, which I was not intending to do.  It was a nice, reflective ending to the weekend.


Wednesday, November 3, 2010

Vienna Reunion

During the reunion weekend at Hope College, there was a time for those who had participated in the Vienna Summer School to get together.  It was a reunion for all the years.  Two of my housemates and I attended Vienna Summer School in 1989, the year between our Junior and Senior year.  Dr. Stephen Hemenway was the director of the program when we participated and he is still the director today.  I was excited to be able to see him again.

 Lisa, Doc, Michelle
Michelle and I went to the event.  There were only two other people from the year we went, Andrew and Greg.  We didn't hang out with them much during that time, but it was nice to talk to them and compare memories and try to remember the other people's names from the group.  Doc had a photo album from our year to try to help us refresh our memories.  Michelle and her husband had gone on a Vienna Reunion trip back to Europe in 2006 and she recognized one lady from that trip.

In one of the buildings they built after we had graduated (the Martha Miller building), the auditorium is dedicated to Doc and his predecessor.


When I came back home, I read my journal that I had kept during the time.  It's interesting to read it in retrospect 21 years later.  I'm glad I had kept one because it does help one remember things that get forgotten.  Although I'll never forget what a great experience that was.

Tuesday, November 2, 2010

Reunion Photos

My trip back to the mid-west included a weekend in Holland, Michigan attending my 20 year college reunion.  Things have really changed since I went to school at Hope College.  Both the town and college have expanded.  I drove into town and didn't recognize anything. 

I was staying with one of my college housemates who still lives in town.  When I drove up to her house, I did recognize the sign she had hanging out front.  It was the exact sign that we had hanging in front of our college house when we graduated.  Her mom had it made for us and had stored it all these years.  Below is four of us with the sign (the other three couldn't make it for the reunion).


We spent some time walking around campus and visited our old house.  It is no longer called Smith Cottage, as it was when we were there.  It is now the Marguerite Prins French House.  It looked a little nicer and they had installed new railings in the front.


At the reunion brunch, one of the staff talked about all the physical changes the college has undergone.  One project was the remodeling of an old building, Graves Hall.  At one point, it was a church. Another time is was the library.  When we were in college, we had classes in the building.  It is still being used for classes, I believe.  But now it is much nicer.  The picture below is looking out one of the stained glass windows.

 As we were wandering around in Graves, we went down to the basement and saw this stack of boxes.  On one side is a sign that says "All files long-term storage".  Then we noticed the second box from the bottom listed 1990, which is our graduating class.  A funny (and kind of sad) reminder that it has been 20 years.

Monday, November 1, 2010

Rusty Revealed

Yellowstone Impression IV
hand dyed fabrics,
machine pieced and machine quilted
13-5/8" x 11-3/8"
© 2010 Lisa Flowers Ross


The Twelve by Twelve group has revealed their Rusty challenge pieces. Once again, I am amazed at how varied they are even though using the same color scheme. My play-along piece is above.

You may have been following along with the
process of this piece here on the blog. I rearranged some of the pieces from the last view. Since the "ruffle" didn't work, I did the little circle "bubbles" in stitching and then went over those with a white crayon. I'm undecided about that part. It might be a little too much as it reminds me of lace. But it does work pretty well for the look I was aiming for.