Pages

Showing posts with label textile art. Show all posts

Wednesday, September 3, 2014

Discharged

In an earlier post, I shared some photos of when we did some discharging of fabric at my friend's studio.  I have used some of the black discharged fabric to create a small artwork.

Dusk
hand dyed and discharged fabrics, machine pieced, free-motion stitching
14-3/4" x 12"
©2014 Lisa Flowers Ross


Here is a detail of the free-motion stitching.
  

Monday, January 6, 2014

Vertical Nature

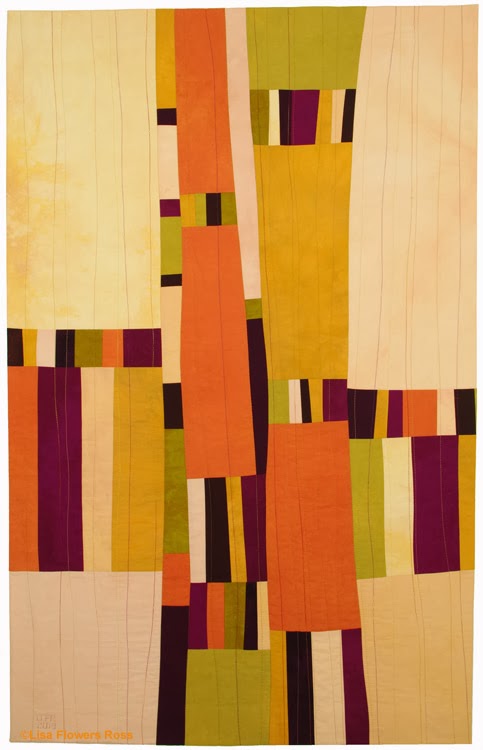
I have several series that I would like to continue working on this year.  Vertical Nature is one of them. I was able to finish the fifth in the series before the end of the year, so I could start the year working on a new piece.  But what I realized is that I haven't actually shared any of the pieces in the series with you yet.

You might have caught a glimpse of them on the walls when I showed my nice clean studio for the open studio event.

My original inspiration for the series started with pictures I have of canyon walls.  But as the series goes along, it may change.  The inspiration is just the starting point.  I decided to call it Vertical Nature, because I can expand the series to use other inspiring vertical nature things like grasses or trees.

Here is Vertical Nature I and II.

 Vertical Nature I
hand dyed fabrics, machine pieced, machine stitched
50-3/4" x 32"
©2013 Lisa Flowers Ross
$1900


Vertical Nature II
hand dyed fabrics, machine pieced, machine stitched
43-3/4" x 25-1/2"
©2013 Lisa Flowers Ross
$1300

I'll show you the third and fourth piece of the series in the next post.

Monday, November 4, 2013

Utility Series

In my last post, I showed you the first piece of my Utility Series.  Here are two more.

T-Square #2
fabrics hand dyed by artist,
fused appliqué, machine stitching
10" x 10"
Available at Lisk Gallery (Nov. 7-Dec.31)

T-Square #3
fabrics hand dyed by artist,
fused appliqué, machine stitching
10" x 10"
Available at Lisk Gallery (Nov. 7-Dec.31)

The Utility Series is named for the the shapes in the artwork and for types of tools and hardware. I have sketches for L-brackets, C-clamps, D-rings and O-rings.

These first pieces in the series will be in the Lisk Gallery Small Works Group Show starting this Thursday, Nov. 7 (opening reception 5-9 p.m.) through Dec. 31.

Monday, August 12, 2013

Bobbin Work

Here is another new artwork I managed to finish recently.  It started out as part of a larger piece which was part of a new series I have started.  But when I had it all pieced together, I decided I didn't like it.  So I cut it up, ripped seams, added some new parts, re-sewed and now I have this piece, which no longer fits in the series.  And I have another part that still needs some work.

Lined Up Around the Block
38-1/4" x 22-1/4"
fabrics hand dyed and rusted by artist, 
machine pieced, machine stitched
©2013 Lisa Flowers Ross
$1100

You might notice the darker horizontal lines of stitching.  This was done with a heavier, perle cotton thread.  The problem with using perle cotton thread is that it is too thick to go through the machine needle.  So to use it in the machine, it needs to be in the bobbin.  I have a separate bobbin case for this because you really need to loosen the tension on it a lot.

Using the perle cotton in the bobbin means it will be on the bottom of whatever I am sewing. Therefore, if I want it on the front, then I have to sew the piece back side up.  But then I can't see where I want to go.

What I did was pin where I wanted the lines to go from the front and then flipped it over.  On the back I could see the pins and then I placed 1/4" masking tape along the pin lines, removed the pins and I was ready to sew.

Here is a picture of what that looked like when I was sewing.


I learned this bobbin work technique in a class I took many years ago.  I have not used it in my work before.  But I'm glad I had the knowledge to do it now because I like the look of those thicker lines.

Friday, August 2, 2013

New Artwork, New Gallery

Between all the summer trips and other activities, I have been trying to get some work done.  I have several pieces put together.  I just have to do the stitching on them.   But I can show you this piece that I have finished.

It is the first, in what I hope will be a series (although there is only this one just now).

Foliaris I
33-1/4" x 29-1/4"
fabrics hand dyed by artist,
machine pieced, machine stitched
©2013 Lisa Flowers Ross

Here is a detail of the stitching with orange thread in the middle.


This piece will be available for purchase at the Robin B Gallery in Chicago when it opens in September.  I am happy to have this gallery representation.

Their physical doors may not be open yet, but they do have the website up and running. Click on their name above to check it out.

Thursday, May 30, 2013

Another DFC Finished

Just thought I would share one more daily fabric composition that I finished.  I cannot believe I did these in February and am still working on finishing some.
DFC02.28.13

Friday, May 10, 2013

Striae I

Here is a better look at Striae I that is hanging in the WaterCooler building.  The Striae pieces are a subset of my Lines series. The light color section has lines that were screen printed as well as free-motion machine stitching lines.  The rectangle was created when the screens overlapped, same with the darker lines.


Striae I
hand dyed and screen printed fabrics,
machine pieced, free-motion machine stitching
16-1/2" x 18-1/2"
©2013 Lisa Flowers Ross
$250

Thursday, May 9, 2013

Art at the Watercooler

Several weeks ago I talked about the Chair Affair lecture event my friend and I went to.  The event was held at a building called the WaterCooler.  Here is a description of it:

"Located at the corner of 14th and Idaho, the WaterCooler is downtown Boise's home to emerging and innovative businesses - the future of job growth and economic potential in our community. We provide our residents with a home that encourages collaboration and offers mentoring, community engagement, growth, and success. We offer a venue for dialogue, learning, creativity, and the entrepreneurial spirit. A community-based non-profit, we welcome involvement and support."


Those are a bunch of water containers on the wall behind the desk.

While at the event, we noticed some local artists were showing artwork on some of the walls. Later, I contacted the building manager and ask if they would like some more artwork on their walls. The answer was yes.  

I went back to look at the walls and measure.  The other artists had the main walls in the front, but there were quite a few empty walls in the rest of the space.  Eventually, I decided to hang three pieces.


My Personal Logograph #5 hangs in this area that has a foosball table in it.  I think it helps brighten up the space.  I had originally planned to hang Sun Spots here, but that will be sent off to an exhibition soon.

The only lighting in the hallway areas seems to be natural lighting from the windows.  So it is a little dark.  These are the other two pieces I hung.  The one on the left is Striae I and one the right is Color Fields #15, in it's original orientation.  For my Color Fields exhibition, we decided to hang it vertically.


Tuesday, April 30, 2013

Printed Fabric

Previously, I showed you some of our screen printing on fabric.  Today I'm going to show you the "unsuccessful" fabrics.  I say they are unsuccessful because they did not turn out how I wanted them to.  However, I think some are usable, as is.  And the rest can be worked further to become something more usable.  I might try stamping, adding paint or rubbings.

The first day we worked with screen printing.  I tried using the framed screen but wasn't having much success with that.  So I mostly worked with the thermofax screen I had.

The fabrics looked pretty good when I printed them.  But they were still wet.  As they dried and then got washed, some of the dye was lighter or removed in places (the other reason I would call them unsuccessful).  I don't know if the soda ash didn't soak into the fabric enough in those areas or it was the way I printed the dye.

Here are some of the yellow, orange, reds done with the thermofax screen.  The orange piece doesn't look like there is anything on it.  The dye color was probably too similar to the fabric.  The red piece on the right end was actually a printed grid using the lines screen one direction, then turning it 90 degrees.  Most of it washed out or the color was too similar to the fabric.


This was printed with blue using the thermofax screen.  This one turned out pretty good.


Since I had quite a bit of dye leftover, the next day I decided to experiment with mono printing using a piece of plexiglas. I used the some of the same pieces of fabric from the day before.  Below, in the first yellow piece, the long orange lines were screen printed and the red was the mono printing.

In the middle piece, there were suppose to be more lines but I had too much dye on the plate when I mono-printed it, so it just ran all together.


Here are some of the pieces I mono printed in the blues and greens.  The light blue piece on the right side had large screen printed lines on it from the day before.


Here is another piece that I mono printed with a looser weave fabric.  That gave it more texture, which I like.  I also like that when you mono print, the fabric is different on the front and back.  You can see the front on the right hand side and the back on the left.  Two for one!


Another mono printed piece with the front on the bottom and back on the top.


I also tried stamping with the thickened dye using a stamp I had made out of  cut fun foam that was attached to a piece of plexiglas.  That seemed to work pretty well, except that some of it was washed out again.


I need to keep working on it, but I think I learned some things.

Friday, April 26, 2013

Screen Printing on Fabric

Yesterday, I did some screen printing on fabric with my friend Mary.  Previously, I had made a padded cover for my cutting table to print on.  Here it is in it's first use where I tried screen printing ink with a thermofax screen.


I rolled the table out and set up our printing area in the garage.   This time we were using thickened dyes instead of paint or ink.


Here's Mary getting her screen ready.

I have the Screen Printing: Layering Textiles with Color Texture & Imagery book by Claire Benn & Leslie Morgan marked with lots of sticky notes.  And I have done some screen printing on fabric at Linda McLaughlin's studio.  But this was the first time I did it "on my own", so to speak, with a frame screen.  (But I wasn't on my own since Mary was there.) And I admit, I have no idea what I am doing!

We tried different temporary methods of making prints with the screen.  I wouldn't say we were very successful, but we did learn some things.  For example, I don't think I made the dye thick enough.  I used sodium alginate as a thickener.

The first time I tried to use the sodium alginate some years ago it turned into a big blob.  There are no instructions on my package on the amounts to mix.  This time I mixed it according to the instructions I saw on a package in the art store.  It was a little too runny, a syrup-like consistency. So next time I make it, it should be just perfect.

We carried on and tried some different things.  Then, I ended up going back to using my thermofax screen because I was able to get better results with it.  It is also smaller and easier to work with.  Here are a few of the fabrics I printed. I am exploring lines.  I think I will experiment with some mono-printing today since I still have some of the dye leftover.