Pages

Friday, January 31, 2014

Kurva

My friend, Kathleen Probst, had an artist's reception yesterday for her solo exhibition entitled Kurva at the Boise State University Special Events Center.  This is the same location that I had my solo exhibition a few years ago.   It is a very nice place.

Here are a few pictures from the event (posted with permission of the artist).  It was the first day in over two weeks that was sunny, so there was a good turnout.


 Kathleen is on the right talking about her art.


The exhibition will be up until July 13th.  So stop by BSU to see it.

Wednesday, January 29, 2014

Rearranging

I have had my studio set up the same way for some years.  I thought I had the best arrangement for the space and furniture I had.  But as I was working recently on a very large (for me) piece,  I just didn't have full access to all of my design wall because my sewing machine & table are butted up to it, like this (This is an older picture):


I had an idea to move things around to see if I would have more access to the design wall.   The first thing I tried was turning the sewing table parallel to the design wall.


This arrangement puts me in the corner, it wasn't too bad except that when I want to sew something large, I put up that "bridge" of foam core between the sewing table and another little cabinet (like in the first picture).  In this second arrangement, I would have to move the cabinet into place (it's on wheels). The foam core piece would then block the closet door. It also does not leave much room between the cabinet and the ironing board on the opposite wall.

If my cutting table was folded out to it's full length, then it would be like a maze to move around in. And I'm sure I would impale myself multiple times on the corners of the sewing and cutting tables.

Then I tried the sewing table butted up to the wall opposite the design wall.


The problem with this arrangement is that the cutting table would have to go in the corner in that previous picture.  With it open all the way it would limited access to even more of the design wall.

Therefore, I actually already had the ideal arrangement.  All the pieces went back to where they had been.  I'm so use to working that way anyway.  I have moved the sewing table a few inches closer to the cabinet.

If I have to work on something really large,  I might have to make a free standing design board to lean against the wall with window.  I don't usually work on very large pieces since the arm of my sewing machine is about 6" in length.

The good thing about all this rearranging is that I did get some things cleaned out of the space.


Monday, January 27, 2014

Weekly Square #4

I decided to sew the two-color squares together using the machine rather than sewing them together by hand.  Here is last week's square.

Weekly Square #4

As per Brenda's suggestion, I am labeling all the weekly square posts with "weekly square" in case you want to search and look at them all together.

I can see a pattern here already.  Can you?  I see that I am not exploring all the ways to use a straight stitch.  I am exploring all the ways to create simple lines using a straight stitch.  There are so many ways to do this and patterns to create.  We'll see if I get bored with that and try something else, or stick to the simple lines for the entire year.

Wednesday, January 22, 2014

Thought of the Day

. . . and a reminder to self.

"It does not matter how slow you go, as long as you do not stop."
                                                                                                            - Confucius

Monday, January 20, 2014

Intaglio Workshop

Last week I spent two evenings at Wingtip Press.  The first evening was creating Monotypes, which I wrote about here.  The second evening I attended an Intaglio Workshop using Sintra(?) board that was taught by Cassandra Schiffler.

Intaglio is a process where you incise or engrave into the printing plate.  The ink is applied and then rubbed off the surface.  Ink remains in the grooves and that is what prints.  A relief print is opposite.  Areas are carved away from the plate.  The ink is applied to the surface and no ink is in the grooves that are carved away.

Previously,  Anna and I took an Intaglio workshop using a copper plate.  This workshop used Sintra board which is a material they use to make signs.  It is easier to incise than copper but not as forgiving as copper.

We had a good size class.

Here are some of Cassandra's examples that showed how you could use some color with selective inking (a la poupée).


Cassandra demonstrates how to apply the ink.

Here is my print.  I also tried it with color, but forgot to take a picture.

I would like to explore this technique more.  It is good for line drawings.  I had some trouble doing tight curves with my Exacto knife.  (We used a 4" x 6" plate.)

I feel like I am just scratching the surface in printmaking (literally, too).  There is so much to learn.

Friday, January 17, 2014

Weekly Square #3

Here's the stitching for this week.  The two outer black pieces are stitched on the same way as the other but with black thread.

Weekly Square #3

Wednesday, January 15, 2014

Another Monotype Monday

Monday evening I was back at Wingtip Press for Monotype Monday.  There is no instruction.  It is just a time to go to the studio and work on Monotype prints.  I went without having any real idea of what I wanted to work on.

I brought stencils and stamps and brushes; all different tools you can use in a monotype.  There are so many ways to do monotypes.  I know I have just brushed the surface (literally, ha).

A monotype is where you are working directly on the plate with inks (paint, whatever) and then you pull one print.  That's all.  You can pull a ghost if there is some ink left on the plate.  But then, you have to start over again.

The Wingtip Press studio.

 Brian Schreiner revealing his monotype.  This is the fun part when you get to see how it turned out.

I didn't have an idea to start with but once I start playing around, I usually can find some direction to go.  Here is one of my prints, probably the best one of the night. I used some stencils on this (so far my favorite technique) and the background is actually a ghost from a previous print. 


When you don't have a plan, obviously, you don't always get something good.  But you do learn.  This is probably the only one I like well.

Monday, January 13, 2014

Weekly Square #2

Here is the second square for my weekly project.  The black felt is much thicker than the tan so the stitches really sink into it.


Friday, January 10, 2014

Weekly Project

My friend, Linda McLaughlin, has inspired me to take on a weekly project for this year.  She has done many daily, weekly and monthly projects.  You can see some of them on her blog.  She does wonderful hand stitching on her projects.

The smart thing Linda does is get everything prepared for the project at the beginning.  So she can just pick it up and start stitching.

I have done a few daily projects for a single month, but I have not done a yearly project.  Here are the parameters I have set up for myself.

1) Use materials I already have on hand.
2) One piece completed each week for the entire year.
3) Hand stitch on pieces.
4) Only use a straight stitch. (I'm hoping to explore how many ways I can do that.)
5) Use only three colors of thread.

Here is everything ready to go.


I had some tan and black felt on hand.  They are different thicknesses.  I hope that won't be a problem.  All the squares are six inches.  I have some solid of both colors.  Then I cut a portion of some of the squares off to interchange with the other color (like the second set on the top).  I will either sew the two colors together by machine or by hand to have the six inch square base ready for hand stitching.

I also cut some various size strips of the felt to be added to some of the squares with hand stitching (the bottom right two sets).  My thread colors are black, tan and red.  I'm ready to go.

Here is the first one I did.


Wednesday, January 8, 2014

Vertical Nature

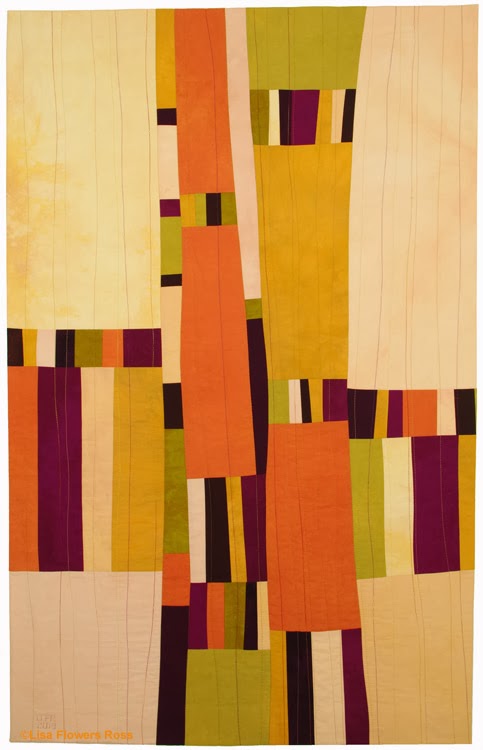
Here are the third and fourth pieces in the Vertical Nature series.  I don't have a picture of the fifth one yet.

 Vertical Nature III
hand dyed fabrics, machine pieced & stitched
39-1/4" x 26-3/4"
©2013 Lisa Flowers Ross
$1,200

Vertical Nature IV
hand dyed fabrics, machine pieced & stitched
40" x 25"
©2013 Lisa Flowers Ross
$1,200

Monday, January 6, 2014

Vertical Nature

I have several series that I would like to continue working on this year.  Vertical Nature is one of them. I was able to finish the fifth in the series before the end of the year, so I could start the year working on a new piece.  But what I realized is that I haven't actually shared any of the pieces in the series with you yet.

You might have caught a glimpse of them on the walls when I showed my nice clean studio for the open studio event.

My original inspiration for the series started with pictures I have of canyon walls.  But as the series goes along, it may change.  The inspiration is just the starting point.  I decided to call it Vertical Nature, because I can expand the series to use other inspiring vertical nature things like grasses or trees.

Here is Vertical Nature I and II.

 Vertical Nature I
hand dyed fabrics, machine pieced, machine stitched
50-3/4" x 32"
©2013 Lisa Flowers Ross
$1900


Vertical Nature II
hand dyed fabrics, machine pieced, machine stitched
43-3/4" x 25-1/2"
©2013 Lisa Flowers Ross
$1300

I'll show you the third and fourth piece of the series in the next post.

Thursday, January 2, 2014

Gold Fork

We started the new year off with a little nordic skiing north of Idaho City at the Gold Fork loop.  I haven't done any kind of skiing in several (or more) years.  It was a beautiful sunny day.  It was good to get out of the inversion.

There was enough snow to ski on, just barely.  The snowshoers outnumbered the skiers.


Wednesday, January 1, 2014

2014

Happy New Year!
May your year be filled with joy, health, peace and community.